Monday, 24 December 2012

Merry Christmas!

Merry Christmas Everyone! 

Updates will be on hold for a few days while I enjoy Christmas and get started on my new job. But please stay tuned, there are going to be lots of exciting things happening here on Princess Cupcake in the new year.

To tide you over until then, here are a few pictures of some winter themed cakes I made.


These are the cupcakes I made as gifts for my family this year. They are spiced buttermilk sponges, topped with a vanilla buttercream. They have been decorated with royal icing snowflakes, snowflake sprinkles and my usual sprinkle of edible glitter.
I'm pretty proud of these, this was the first time I've ever worked with royal icing. Sadly the lighting in this picture does not show the buttercream to it's best advantage, it's actually a lovely minty green colour. However it's been very grey here in England these last few days which has made photography a challenge.


And these cupcakes were presents for my housemates last year, these are actually the same buttermilk sponges as this year. These ones have been iced with blue water icing, with piped snowflakes, more of the snowflake sprinkles and edible glitter. Please excuse the fact I put them back into the bun tin for photography, I can actually remember why I did. 


And finally this cake was made for a friend of mine a couple of years ago. This is a chocolate sponge, sandwiched and topped with vanilla buttercream (actually this is pretty much the colour of this years cupcakes!). It has been decorated with yet more snowflake sprinkles, silver balls, a dusting of icing sugar and a touch of edible glitter.

Can you tell that I like snowflakes? And glitter?
Merry Christmas everyone!

Monday, 17 December 2012

Baked Gifts - Part 2, Presentation Makes Perfect

I wasn’t originally planning on turning my discussion on how to plan home baked gifts into a miniseries but after publishing what is now titled “Part 1, Tips to avoid stress and manage disasters” I was stuck by the inspiration fairy. So here I present Part 2, Presentation Makes Perfect.

This article is a little heavy on the links, and I freely admit that all of them are to Lakeland. I promise that I’m not being paid to promote them; I just really like the quality of their products. That and their website usually has everything I need in one place! However these particular products and similar ones can easily be found on Amazon or in high street shops.


In my opinion the key to brilliant homemade gifts lies in the presentation, if something has been presented beautifully receivers are less likely to notice any flaws! Taking the time to present a gift nicely really shows how much you care, and if you’ve spent hours working on something you want it to be displayed at its best right? So here are my ideas for making homemade gifts really look magical.


Presentation Bags
Available from: http://www.lakeland.co.uk/12007/50-Presentation-Bags

One of the simplest ways to present baked goodies, these bags are gusseted which makes them easier to fill (and fit more in...). These bags are perfect for individual cupcakes, biscuits and chocolates.  These bags are plain which makes them perfect to use all year round, just pop your goodies tie it up with some nice ribbon and you’re all done!

And at £2.99 for 50 bags you can’t go wrong!


If cake pops are more your thing why not try these cake pop bags? This pack of 12 bags includes white ribbons and is a snip at £1.69
Available from: http://www.lakeland.co.uk/15931/12-Cake-Pop-Bags


Or how about some cellophane sheets in festive colours? This pack of 12 costs £3.99 and includes 4 of each colour (red, green and clear). These sheets are perfect for chocolates and candies.
Available from: http://www.lakeland.co.uk/3825/Cellophane-Sheets  


In a similar vein to the cellophane sheets linked above Lakeland also offer these foil wrappers. Perfect for chocolates and a bargain at £4.99 for 200!
Available from: http://www.lakeland.co.uk/15559/200-Foil-Wrappers


Boxes
Sometimes bags just aren’t enough, in which case the obvious solution are boxes! Available in a huge variety of designs and sizes for just about anything you can think off, these are some of my favourites.


Cake pops can be a bit awkward to package (well I think they are, I don’t actually like them so I’m only guessing) especially if you have created a particularly complex design. In that case why not present them in this specially designed box? This box will hold up to 8 sticks, and costs £4.29 for 2 boxes.
Available from: http://www.lakeland.co.uk/15932/2-Cake-Pop-Gift-Boxes


These boxes are brilliant in my opinion; they are designed to hold cakes (up to 6’’ or 15cm) but by using the included inserts these boxes can be adapted to hold 4 cupcakes or 9 petit fours! The design is suitably modern and festive, and at £2.99 for 2 boxes they really are good value. But get in quickly as these boxes are reduced to clear!
Available from: http://www.lakeland.co.uk/16861/Lakeland-Christmas-Baubles-2-Cake-Boxes


Given that macaroons really are a pain to make, I think they deserve special presentation! This lovely box is designed for macaroons and it looks very pretty. This costs £5.49 for 2 boxes but like the cake boxes are reduced to clear.
Available from: http://www.lakeland.co.uk/16862/2-Macaroon-Boxes

Finally there is this box, which features a pretty pink gingham design making it suitable for use all year round. This lovely box is designed for cupcakes and can hold up to 6 cakes, and at £2.79 for 2 boxes it really offers fantastic value.
Available from: http://www.lakeland.co.uk/15302/2-Cupcake-Boxes


Other ideas
Boxes and pretty bags are all well and good but they aren’t the only way to present gifts and they aren’t much use if you are giving jam! So finally here are some other simple ideas to make your homemade gifts look extra pretty.


No gift of jam, marmalade or chutney is complete without a nice label to tell the recipient what is inside! So why not jazz up your jars with some unique homemade labels? Get technical and design some on the computer to print out onto white labels (available in stationery shops) or if you are feeling creative why not get busy with brightly coloured card? Just punch a hole in the corner, decorate with fancy pens, glitter, stickers or whatever takes your fancy and tie the label onto the jar with some string or nice ribbon? Another easy way to jazz up your jars is with jam-jar covers (a perfect way to use up scrap fabric) or with some pretty lids. Lots of cooking shops sell patterned lids amongst the preserving equipment and these are an easy way to add a cute touch to your jars (especially if you are recycling old jars!)


How about including a long lasting gift with your goodies? When giving cake or biscuits why not buy a pretty cake tin put them in? That way your recipient gets a lovely new tin to keep (extra tins are always useful) and you don’t have to worry about cakes/biscuits going stale in non-airtight containers. Finally don’t under estimate the effect of using seasonal decorations and cake cases when making cupcakes. This is a really simple way to make your gifts look extra special!


That’s it for now everyone; I hope that these ideas are helpful in some way! 


Friday, 14 December 2012

Guest Post: Spiced Banana Cake

Today marks the introduction of a new feature on Princess Cupcake, guest bloggers. This is the first of several posts written by my best friend Inthannon. Enjoy! All photographs are owned by Inthannon, so please do not use them without her or my permission.

Last week my friend Princess Cupcake asked me to do a couple of guest posts for her since I’m almost as much of a baking enthusiast as she is. This is the first and later on I will bring to the table my Finnish recipes for couple of Christmas goodies.

This first one however, is something I made last night because my fiancĂ©e’s sweet tooth was aching. ;) Since I know Cupcake doesn’t care for bananas and I really like banana cake and think it’s a brilliant way to use up over ripe bananas (if you have them in the house), here’s my favourite one with a Christmassy twist.

First thing about banana cake is that the riper the banana the better the cake. The best bananas for this kind of thing are the ones that you look at and think “That’s too dark and gooey to eat” (Obviously if the banana looks like it’s growing unspeakable things or about to walk out of the fruit basket, don’t bake it, bin it). One thing you’ll notice between the cake you’ll make and my pictures is that yours will be darker. This will be because you’ve done what I said and not what I’ve done and used properly ripe bananas... Hello from Miss Hypocrite ;)

Note on measurements: Since I’m weird and foreign, most of my recipes have these strange measurements of dl. This stands for decilitre, which is 100 millilitres. So if the recipe says 2dl of sugar, take a standard measuring jug that has millilitres on it and using the millilitre scale measure out 200ml of sugar. Or go to uncle google and search for a way to convert sugar volume to weight. Or a volume of your choosing.


Spiced Banana Cake (or about 24 cupcakes)
150g butter
2.5 dl sugar
2 eggs
4-5 dl flour (depending on how moist you want your cake, also depends on size of eggs)
2 tsp baking powder
1 tsp bicarbonate of soda
1 tsp salt
1 tsp ginger
1 tsp cloves
2 tsp cinnamon
3 crushed bananas

For a standard cake, heat the oven to 170C or Gas Mark 3-4. For cupcakes (unless using a cupcake maker) 180 C/Gas Mark 4. Cream together the butter and the sugar, then beat in the eggs one at a time. Mix together all the dry ingredients and then slowly add into the mix in turns with the crushed bananas. Mix until even. Pour into a buttered/floured cake tin (deep, 9”/23cm diameter) and bake for 50-60 minutes, or until cooked through. Cupcakes should only take 8-12 minutes in a machine or about 15 minutes in the oven. I used my cupcake maker for these mainly because I’ve only used it twice.
Figure 1 This is pretty much the ideal amount of mix for my cupcake maker.
Note: I tend to almost double the amount of spices since I enjoy spicy things, but there is no real need to do this (unless you’re like me). Also non-stick palette knife is the BEST at getting cupcakes out of the maker. Just slide it between the cake and the maker, apply a little leverage and hey presto, one free cake!

I decided against icing these, just because I find they are nice on their own (and I ran out of day) but I think a cinnamon buttercream might be really yummy with these. Or maybe something with ginger. This is the beauty of baking, we can all make changes to the recipe if we don’t like something in it.

Until next time,
Inthannon

Tuesday, 11 December 2012

Baked Gifts – Part 1, Tips to avoid stress and manage disasters

I love handmade gifts, they are so much more personal than shop brought gifts and one of my favourite things to do is bake gifts. However Christmas is a busy time of year so here are my tips for giving baked gifts while avoiding stress and disasters!

Plan ahead and make lists
In my opinion this is the most important step to undertake when considering giving baked or homemade gifts. Way ahead of time, stop and think about the following things and then write it all down:
  • Who you want to bake for
  • What you want to bake
  • When you will be giving people their gifts
  • What other stuff do you have to do

Why do you need to think about all this stuff? Well you need to think about who you want to bake for as some people may not appreciate a baked gift (certain members of my family wouldn’t I know), also some people may have special dietary requirements that you need to account for. That is why it is also important to think about exactly what you want to make, it’s no good planning to make everyone chocolate cupcakes if you know that someone doesn’t like chocolate for example. So try and find a recipe that works for the maximum amount of people.

It is also important to consider when you will be seeing people; baked goods have a limited shelf life and need certain storage conditions. It’s no good making something 2 weeks in advance if you know it won’t keep until it’s required. As an example I know I’m seeing relatives this weekend, so I need to have their gift ready first, everyone else I’m not seeing until Christmas Day so I can make their gifts closer to the big day.  Additionally consider all the other things you have to do between now and then like shopping, wrapping presents, making Christmas dinner .etc and choose a recipe that fits into your schedule. 

To use myself as an example I know that I’m not very busy this week so I’m baking a slightly more time consuming recipe for the relatives I’m seeing this weekend (Pepper Nuts for those who are interested) but the rest of my family are getting cupcakes. Why? Because I can make and decorate those in stages and slot it around everything else I have to do and I have a lot of Christmas cooking to do!

Plan some more
Got your recipes? Excellent now it’s time to plan exactly what ingredients you need as you don’t want to find yourself running out of anything on Christmas Eve! So sit down and write down everything you need and how much then head to your store cupboard check what you have and what you need.  This is also a good time to work out your baking schedule.

Shop and bake
Finally it’s time to buy all your ingredients and get baking. I would seriously suggest buying as many ingredients in advance as possible, there’s nothing worse than the shop running out of stock just as you need something. I recommend having a backup plan just in case the worst happens and you can’t get the ingredients you need.

Once it’s time to start baking make sure you have everything and enough time to do it in. Try and get ahead where possible and remember you don’t have to do everything at the same time. It’s perfectly OK to bake the cake early and leave decorating it for later (it might even be easier if you leave the cake for a day or so...) and where possible make decorations in advance. They’ll need some time to firm up or dry so it’s best to get them done in advance.

Finally it’s don’t panic; if a recipe doesn’t work or your decoration isn’t perfect don’t sweat it. Keep calm and carry on! And maybe take a look at my guide for dealing with baking disasters?

Good luck everyone! I’d love to hear what sort of things you are baking for Christmas, let me know in the comments!

Monday, 10 December 2012

Monday Recipe Danish Pepper Nuts

At Christmas I can't help but bake recipes that call for spices, especially gingerbread. There is something about the smell of cinnamon and ginger that just screams Christmas to me. 
I got this recipe from an article in The Telegraph magazine a couple of weeks ago in which there was an interesting selection of Danish Christmas recipes. These sounded the most interesting to me so naturally I had to try them! I’m not sure how correct my attempt at these is, my research into these was blighted by a lot of conflicting information.
The following has been summarised from Wikipedia:
PfeffernĂĽsse are small, firm, round biscuits, sometimes with ground nuts. The name translates to pepper nuts, which describes their spicy taste and the fact that some recipes do contain nuts (walnuts or almonds). They do not necessarily contain black pepper, Danish recipes call for white pepper.
And this is where the conflicts arise, as you can see from below as my recipe does not call for pepper of any kind and the article claimed that the name just comes from the warmth of the spices as there is no pepper in them. Further research I conducted uncovered recipes containing everything from pepper (both black and white), cardamom and even mace! But when baked they do look like the pictures of pepper nuts I found on Google, so I’m just going to stick with this version as I know that I like them! If any Danish folks to read this post please comment below and correct me on the recipe! 
Makes 120
Ingredients
375g plain flour, plus extra to dust
½ tsp baking powder
½ freshly grated nutmeg
½ ground ginger
2 tsp ground cinnamon
175g salted butter
180g soft, dark brown sugar
1 egg, beaten

Method
In a large bowl; sift together the flour, baking powder and spices. Melt the butter and stir it into the flour mix. Add the egg and the sugar, and then knead the dough on a lightly floured surface until smooth. Leave the dough to rest for an hour at room temperature.
Preheat the oven to gas 4/180 C, then shape the dough into small balls, about 1.5 – 2 cm in diameter. Place them on a lined baking tray, leave a little space between them (doesn’t need to be a big space as they don’t spread much). Bake for 10 minutes and cool on a wire rack.
Apparently these keep for up to four weeks in an airtight tin. 

Saturday, 1 December 2012

When baking goes wrong, part 1: How to cope with baking disasters

As far as hobbies go baking is a fairly cost effective hobby, even if a recipe doesn’t work out the way you hoped the results are usually still edible. But having a recipe go wrong can be a little upsetting and annoying, so here is a short guide on how to cope when baking goes wrong.

Step 1 Allow yourself to be annoyed or upset
When things go wrong I get annoyed if it’s a recipe I know well or upset if it’s the first time I’ve tried it. No matter what emotion you feel when the worst happens I find the best solution is for 5 minutes to just let yourself feel like that, so have a cry or yell at your oven. Do whatever it takes for you to get the initial upset or anger out of your system because bottling up your feelings is not healthy.

Step 2 Try and find the positives
Just because something in a recipe has gone wrong doesn’t mean that the results are awful, most of I find there is usually a positive side. As an example my recent attempt at macaroons, they went totally wrong but they still tasted like they should. Always try and find that positive part of the bake, like the fact it still tastes right or it can be used for something else. So if you cake has sunk in the middle that doesn’t mean you can’t still eat it. It’ll still taste good and if you don’t want to serve it just cut it up and use it to make something else like cake pops or trifle!
Sometimes everything going wrong can be funny (especially if it’s a recipe you make a lot) and I think finding the funny side and having a good laugh totally counts as a positive side.

Step 3 Work out what went wrong
You may have noticed that I do this when I post about recipes I’ve tried, I believe that analysing your bake is very important. If you don’t try and work out why everything went wrong what is there to stop you from making that mistake again? It may be something as simple as opening the oven door too early and too often or a complex series of issues (see my post on macaroons!), but if you try and figure out the problem it should be much easier to avoid it happening again. But don’t panic if you can’t figure out the problem, sometimes stuff just happens!

There you have it my 3 step program to dealing with baking disasters, in part 2 I shall be listing solutions to common baking problems and tips on how to avoid having a disaster. 

Tuesday, 27 November 2012

First adventures in macaroon making

It may not be immediately obvious given the content of many of my posts here and the name of this blog, but I do actually bake more than just cupcakes! At the moment I am focusing on expanding and improving my skills rather than widening my repertoire, with a particular focus on bread and pastry. However since I can’t be bothered making pies and am running slightly low on yeast, bread and pastry have been pushed aside somewhat in favour of more interesting experiments. This is why a couple of weeks ago I decided to try my hand at macaroons.

I love macaroons, they are one of my favourite things to have with a cup of tea, sadly they are also very expensive which is why I don’t get to eat them nearly as often as I like. That and my favourite shop to buy them from is in London and I don’t go there very often...
Moving on, they are also have been a challenge on The Great British Bake Off several times and given my intention to apply for the show I figured it was about time I tried them out. And er this was the result


As you can see, not a complete success, apart from being rather misshaped (I didn't take my time piping them) they look OK  There is a crisp outer shell, the problem came when I tried to remove them from the sheet. It turns out they weren't fully cooked, the inside of the shell was still sticky and wet. However despite this I did taste one and they did taste right, so all in all I don’t think this was too bad for my first attempt.
Now when something I bake goes wrong I always try and figure out why, I believe that is the best way to improve. So here is what I think went wrong here.

First of all I think the proportions of my ingredients were off. You see last Christmas I was given a macaroon making set which included a bag of almond meal (blend of icing sugar and ground almonds which is the base for a macaroon), which according to the instructions in the kit was a 1:1 ratio of almond to sugar. However the kit recipe was made using the Italian meringue method and since I don’t like working with sugar much I didn't follow those instructions. I actually followed the instructions in a macaroon recipe book I own, which makes them the French way and in the book the almond meal ratio was 2:1 (icing sugar to almond). I believe using combining the two recipes with their different proportions was my first mistake.

Secondly I don’t think I left them alone long enough, you see after piping out the mixture it is essential that macaroons are left alone to dry out. According to my book this can take anything from 10 minutes up to an hour and is the key to making macaroons, this drying process is what gives macaroons their distinct crinkled “foot” and crisp outer shell. As I was up against time constraints I don’t believe I left mine long enough to dry out and in addition to this I don’t think I baked them long enough, this is partly why I think the inside was still wet and sticky.

Finally I think the other problem was the weather, I know that sounds like I’m being very British and just talking about the weather because I can but I do have a point. You see meringues are very sensitive to climate, and can really only be baked on dry days, otherwise they absorb any moisture in the air and tend to go rather sticky. Since macaroons are essentially almond meringues I am beginning to suspect that they might also be affected in this way, especially as it was a foggy day I was making them on.

So all in all I think are combination of things contributed to my downfall, however now I have identified them hopefully these issues can be resolved for future attempts. Will I be attempting macaroons again? Yes but probably not for quite a while! 

Saturday, 24 November 2012

opps, unexpected hiatus

As you may have noticed from the complete radio silence here I have had a little unexpected hiatus from Princess Cupcake, however this is now over and hopefully I should have some new posts in the next couple of days.

Why the sudden silence? Well truth is, my life has recently got a little hectic again. Recently I have been rather busy job hunting, celebrating my birthday and getting ready for Christmas (lots of fun craft activities). All this in addition to my volunteer work and all those other boring things we have to do (*cough* cleaning *cough*), which means I really haven't had much time to bake, this in turn means I don't have much to write about here. Hopefully now that life has settled down a bit again and I've been able to start baking again things should start to pick up a bit round here.

So what have I been baking? Nothing too exciting, mostly boring things like flapjack and bread, however I have had my first attempt at baking macaroons, the results of which I shall post about in the next few days. I'm also going to start posting some Christmas/Winter themed stuff, how to plan your Christmas baking and fun food gifts to give .etc However I am going to take a break from writing recipes, I haven't had much inspiration in that department recently and I really don't want to start posting recipes from books. From now on recipes will still be posted on Mondays just not as frequently as before and other posts will go up whenever I get time to write them! Same goes for book and product reviews, these will still be Fridays just on a more ad hock basis.

Well that's all for now, I shall return in a day or so (maybe later today looking at the time!!) with my first adventure in macaroon making and a kind of follow up post to the fondant fancy adventure.

Tuesday, 30 October 2012

Snapshots- Halloween Treats


Snapshots –Halloween Treats
This post is something new I’ve decided to do, basically it’s just a random collection of pictures of bakes I’ve done at some point. These posts probably won’t happen very often but when I do post them I’ll try and keep all the images related to a particular theme, so to get the ball rolling on this new series let’s start with some Halloween bakes!
This post will be a bit short as I generally don’t do much Halloween themed baking since I don’t really bother with it, so most of these bakes are actually for parties that I was forced to attend.

In preparation for my review of the book “A Zombie Ate my Cupcake” I decided to try out one of the tutorials in it. As I’ve been keen to try making meringue frosting I decided to give the Ghost Cupcakes a whirl. These little guys were the result! The recipe was such fun to make, even if the meringue was really sticky! After I took this picture the icing I used for the faces melted a little in the heat of the kitchen, so the sad looking one on the top right now looks like it’s crying! Poor little guy! It wasn't until later that I noticed one of the spider biscuits had lost an eye, poor critter looks like he's had a terrible accident.
The following cakes were baked with my friends as our contribution to the catering of a Halloween party out housemates were throwing.

This was a yoghurt cake covered in water icing and an albino spider, designed to look like a gravestone. The cake turned out to be a bit more crumbly than we expected but I thought that looked good as it make the gravestone look weathered and old.

And now a selection of cupcakes, these ones were chocolate orange flavour. I mostly like the colour of the icing on these.

A selection of albino spiders...

And finally our “radiation” cakes, I honestly can’t remember what flavour cakes these were, probably chocolate. The design was loosely based on the hazard symbol for radiation and was created using the same chocolate dots used on the spiders.
Oh and because I had so much fun making them here is another picture of my Halloween fondant fancies.

That’s all for now I’m afraid; I really don’t do much Halloween themed baking the next snapshots should hopefully be much longer!


Monday, 29 October 2012

Halloween Decorating Tutorial – Spiders and cobwebs

Expanding on last week’s post on quick and easy decorating ideas here is a quick tutorial on how to make simple spiders and cobwebs on cupcakes and biscuits. Both of these tutorials are really easy to do; they literally take minutes and don’t require any fancy equipment so they are great for kids to try. I also happen to find them rather adorable!
IngredientsFor the spiders you will need:
Chocolate buttons or large circular sweets
Eyes, I like to use coloured chocolate dots but blobs of icing or chocolate chips work equally well.
Prefilled icing tube, the sort you find in the supermarket baking aisle.
Cakes or biscuits to put them on
For the cobwebs you will need:
A prefilled icing tube
Cakes or biscuits to put them on
SpidersTo make the spider, take one sweet/chocolate button and attach the eyes. As I use chocolate dots for this I put a blob of icing on the dot and then stick it onto the sweet. Then place a blob of icing onto the cake or biscuit where you want the spider to be and stick the sweet down, finally using the icing tube draw 8 legs from the sweet down onto the cake, simple as that. I then like to add an extra blob of icing on top of the eye to create a pupil, I think it makes them look much more friendly!
For these spiders I used Galaxy Minstrels and black icing
These work best if you match the icing colour to the chocolate/sweet so use black icing with milk chocolate, white with white chocolate .etc
Last year me and my friends used white chocolate which resulted in albino spiders! 
Cobwebs
The cobwebs are equally simple; however I forgot to take a picture of them so please enjoy my awful MS Paint diagrams! All you need for these is a surface to apply icing to (cake or biscuit) and an icing tube.
To start draw a 6 point line star on the top (honestly I have no idea what to call this shape!), bonus points if the lines are straight and all the same length!
Then around the centre draw a series of small lines, this should connect all the longer lines and make a circular-ish shape. Again bonus points for getting the lines all the same length!
Continue drawing lines in this manner until you use up all the available space, I try and leave a little of the long lines poking out but that is just a matter of personal preference.
For an extra spooky effect why not add one of the candy spiders once you’ve finished?
Or how about this idea, follow the pattern above as normal but draw it onto greaseproof paper or baking parchment using melted chocolate or royal icing. Leave to dry, then peel off the paper and hey presto you have a spiderweb. These look great sticking out of a pile of frosting on top of a cupcake, or make lots in different sizes and glue them onto a large cake.
So there we go; two tutorials for simple Halloween cake decorating. And considering its half term here in the UK it’s a perfect way to keep children amused!
(I hope these instructions make sense, I have apparently lost my ability to type English today!)

Monday, 22 October 2012

Quick and easy Halloween Cupcakes

Halloween presents a great opportunity for specially decorated cupcakes for parties or just for fun. Themed cupcake decorations can be as easy or as complicated as you like depending on your level of skill, so in this post I’ve detailed a few quick and easy ideas for spooky treats. Some of which I will be posting tutorials for in the next couple of days. All of these ideas are great for children to try.
Keeping it simple
If you don’t have much time to decorate cakes the quickest way to just to make a simple water icing and throw some sprinkles at them. Cakes decorated in this way can easily be matched to an event or theme by matching the sprinkles and the icing colour to the event. So for Halloween try making icing in some spooky and unusual colours, bright green or black for example.  Orange and black strands are a popular choice for sprinkles but I really like using little bats and ghosts.  Oh and a touch of edible glitter is always fun! Another easy way to make creepy cakes is to colour the cake mixture, normally when I do this I make pink cakes but for Halloween why not try green or blue?
Also don’t forget, even the simplest cake can be made to match a theme by using special cake cases, shops are full of Halloween inspired designs right now so shop around to find your favourite!
Vampire blood cakes
These are also very simple but can look pretty cool. Simply cover any flavour of cake (Red Velvet works a treat) with white icing or buttercream, then make a really runny red icing and dribble it over.  
Ghosts
These are taken from the book “A Zombie Ate My Cupcake” and are very effective (book review coming soon). Starting with whatever cake flavour you prefer make an Italian or Swiss meringue then put a small blob of meringue on each cake, top with a marshmallow then spoon more meringue on top. Use the back of a spoon to shape it into a ghost shape, let it cool then add facial features with an icing pen.
Gravestones
Again start with any flavour cake you want and a batch of chocolate biscuits. Try and make your biscuits gravestone shaped, rectangles and crosses also work well (at this time of year it’s fairly easy to find biscuit cutters in these shapes). Use a piping bag or an icing pen to write messages onto the biscuits, the classic RIP always works well! To assemble the cakes cover them with green buttercream (not to bright, try and make a grassy green) and stick a biscuit into the top of each.
Optional extra: to suggest a fresh grave dust coco powder or chocolate biscuit crumbs (Oreo cookies crushed in a food processor are perfect for this) in front of each biscuit and add a few icing flowers.
Spider websCover any flavour of cake with black buttercream or water icing, then using either an icing pen or piping bag; ice a spider web pattern onto each cake. Add a touch of white edible glitter because why not?
So there you have it a few quick and easy decorating ideas for Halloween cakes, stay tuned for some in depth decorating tutorials for a couple of these and some other simple designs.  If you have any other ideas for simple cake designs I’d love to hear them!

Monday, 15 October 2012

Halloween Petit Fours: Fondant Fancies

I love petit fours, they are so delicate and pretty, and since they have just been featured on The Great British Bake Off (signature challenge, semi finals) I’ve been keen to try my hand at them! So I did try and continuing with the Bake Off theme, I decided to make mini fondant fancies (technical challenge, final); yeah that was a good plan!
The saga of icing these is below!
I think I may have figured out why fondant fancies are a technical challenge; these were really annoying to ice! I was attempting to balance these on a spoon or a fork and then spoon the icing over them. That didn’t work as the cake kept falling off and landing in the bowl which led to my icing getting filled with cake crumbs! I also tried holding the cake and spooning icing over, that just led to sticky fingers!  My hands were covered in icing! Also this icing looks really thick but is deceptively runny, which meant I managed to drip icing onto the floor on more than one occasion!
 I think the best way to ice these is to put them on a wire rack and spoon the icing over and place with big plate/tray underneath to catch the icing that drips off. This wasn’t an option for me as I didn’t have a plate big enough! The result of this is that my cakes haven’t been iced very well, but since the icing is green I’m pretending that it’s ectoplasm and therefore meant to look like this! Oh yeah if you want to add sprinkles, let the icing sit on the cake for a bit first, I applied sprinkles soon after icing and they escaped down the side of the cake while the icing flowed!
 My cake was also too crumby, so I think a Genoese sponge might work better than a Victoria sponge mix, oh well this was a total experiment which I made up as I went along! And most importantly I had fun trying!
I made a chocolate cake for these but feel free to change the cake flavour to whatever you prefer. These would probably look pretty awesome with a Red Velvet Cake as an example. For the icing I used gel food colouring for these as I wanted a really vibrant colour, if you want a more pastel colour I would suggest using the liquid food dyes available in the baking aisle of most supermarkets. Again feel free to change the colour to whatever you prefer if green isn’t your thing!
Cake170g/6oz butter, softened
170g/6oz caster sugar
3 eggs
150g/5oz self rising flour, sifted
20g/1oz coco powder, sifted
Icing and decorations500g fondant icing sugar
6 tbsp cold water

Green food colouring
Bat and ghost sprinkles
Equipment
8 inch square cake pan, greased and lined
Wire rack
Petit Four sized paper cases
Method
Preheat the oven to Gas Mark 4/180 C
Cream together the butter and sugar, then beat in the eggs. Fold in the flour and coco powder then pour into the prepared cake pan. Spread the cake mixture evenly across the tin, try and get the surface as smooth as possible. Bake for 20-30 minutes, or until a skewer inserted into the thickest part of the cake comes out clean. Leave the cake to cool in the pan for about 10 minutes then turn out onto a wire rack to finish cooling.
Once the cake has cooled slice it up into small squares, I managed to get 36 squares out of my cake. Cut bigger slices if you don’t want petit fours. To make up the icing sift the icing sugar into a bowl, add the water and mix well. Then add the food colouring and mix until you have a nice even colour. To ice the cakes place on a wire rack with a plate underneath and spoon over the cakes, try not to leave any gaps! Leave for a few minutes then add sprinkles if you want, leave to dry. Then arrange the cakes in paper cases.
Look closely and you can see some escaping sprinkles!

(Apologies for the fact this recipe has only just been posted, I wrote it a few days ago but unfortuately I lost internet access over the weekend and have only just been able to post it!)

Wednesday, 10 October 2012

Upcoming Treats

If you are a regular visitor here (I like to convince myself that people do re-visit this blog!) you may have noticed that once again my update schedule has gone a little wonky. However there is a reason for this (and I promise it's not life getting in the way), normal activity has temporarily been suspended because I have been planning some spooky new treats...

Yep if my cunning use of the word "treat" hasn't given it away (or the fact I'm announcing new stuff in October...) I have been planning some Halloween themed posts for this month. So what do I have in store? Well mostly pic spam of my Halloween themed cakes but there will also be some simple decorating tutorials and an awesome book review. Oh and a completely un-spooky discussion of The Great British Bake Off as the final is next week.

The new posts shall start on Saturday and there isn't really a plan for what order they go up in, so stay tuned!

Monday, 1 October 2012

Monday Recipe: Apple and Cinnamon Flapjack

Sadly I ran out of natural light today so these haven't been photographed yet. Hopefully I shall be able to tomorrow and will update this entry then! (This is entirely dependent on the flapjack making it through the night!)
One of the best things about Graze boxes is the range of flapjacks they offer, the best of which has to be the apple and cinnamon flapjack. This recipe is my attempt to recreate my favourite snack!
You want to use a good brown sugar for this, it really adds to the flavour. I normally use Demerara sugar but soft brown sugar (light or dark) work equally well so use whichever sugar you prefer. I don’t suggest using fresh apple in this recipe; I think it would go rather sloppy and make a rather wet flapjack. Try and find dried apple, I found this in Asda quite cheaply but be warned that it might not be sold under the name dried apple. When I brought mine it was being sold as “baked apple”.
Ingredients
120g/4oz brown sugar
120g/4oz butter
170g/6oz rolled oats
1 tbsp (approx) golden syrup
25g/1oz of dried apple, chopped
2 tsp ground cinnamon
Method
Preheat the oven to gas mark 2 /150 C and line a 17cm square tin with baking paper. In a pan melt together the sugar, butter and golden syrup. Once they have melted together add in the oats, apple and cinnamon. Mix well and press firmly into the tin. Bake in the oven for 30-40 minutes until golden brown, leave to cool in the tin. While the flapjack is still warm cut it into as many pieces as you want.
These quantities work in bigger baking pans, however if you use a much bigger tin I would suggest either doubling the quantities or using 1 and half times the quantities. (So 9oz of oats instead of 6oz)

Friday, 28 September 2012

Friday Review: Buckingham Palace, Garden Cafe

My life has been a little hectic recently, which means I haven’t had time to write any book reviews so I’ve decided to post something a little different a review of the cakes I had during my visit to Buckingham Palace last week!
Every summer Buckingham Palace is opened allowing members of the public a chance to see the beautiful State Rooms and a special exhibition. This year the exhibition featured a selection of diamond jewellery and other diamond items from the Royal Collection as part of the Diamond Jubilee celebrations. Given my passion for shiny things and nice jewellery I had to go visit, but this post is not about the Palace it’s about cake so moving on. At the end of the tour, palace visitors are able to get refreshments in The Garden Cafe which is as suggested by the name, in the Palace garden.
Now I had skipped lunch that day, mostly so I had an excuse to buy more than one cake! And these are the cakes I brought.

On the left is a vanilla cheesecake and on the right is a fraisier, both of which were made especially for the Jubilee, hence the crowns on both. Those were made of a lovely dark chocolate.  These cakes were both really yummy, the cheesecake was so creamy with the strawberry sauce balancing out the flavors and stopping it becoming too sickly which can be a problem with cheesecakes. The fraisier was topped with marzipan and filled with some really nice strawberries and cream. Yummy!
Both cakes were also presented beautifully, and the fraisier actually came wrapped in a sheet of plastic to protect it. A nice touch! And the service was amazing, very quick and efficient (which is not surprising considering the amount of visitors they get each day!) and all the staff were extremely polite.  
To be honest the only thing I didn’t like was the price! Each cake cost me £4.75! But for cakes of this quality and when I take into account where I was buying them the price isn’t actually that bad. So in summary, if I ever visit the Palace again I am defiantly buying cake and if any of you ever visit I would seriously recommend the cakes. The cafe also sells sandwiches but they didn’t have any I liked (I’m quite picky about my sandwiches).
Also I am totally going to try and make my own fraisier, but that will probably have to wait until next summer.

Monday, 24 September 2012

Monday Recipe: Lavender Cupcakes

Monday Recipe: Lavender Cupcakes
As much as I love making fruit flavoured cupcakes there comes a time when all my favourite fruits are out of season and I have to stop. But that just means it’s time for some new flavours, and my current experimentation is with flower flavoured cakes!
I love using flower flavours, they are sufficiently different to intrigue people but not weird enough to freak them out! Rose is actually my all time favourite macaroon flavour, mostly because I love the smell of roses and when used in cooking it actually tastes the way it smells. Which I know sounds mad but try it and you’ll see what I mean! I know eating flowers is weird, but quite a lot of flowers are actually edible. At some point I will do some more research into this and post a list of edible flowers, but that shall have to wait.
So imagine my excitement when last summer I found Lavender Sugar available in Waitrose, naturally I had to buy some and I’ve finally figured out what to do with it! Hello cupcakes! These cakes smell divine and I was pleasantly surprised to discover that lavender (like rose) tastes the way it smells.

As this is an experimental recipe, all quantities are designed for use in a cupcake maker and will make 6 fairy sized cakes. However as always this recipe can easily be scaled up and (should) work when baked in the oven.
Sadly I can't find lavender sugar on Waitrose's online shopping, but this would be easy to make yourself. I'll write a tutorial on that later!
The little "spots" are actually lavender flowers!
Ingredients
1 large egg
50g/2oz Self-rising flour, sifted
50g/2oz Lavender Sugar
50g/2oz Softened butter or margarine
Method:
Cream together the butter and sugar then beat in the egg.  Fold in the flour and divide between 6 cake cases and then bake in the cupcake maker for approximately 10 minutes or in the oven at Gas 4/180 C for about 15 minutes. The cakes are ready when a skewer inserted into the thickest part of the cake comes out clean!
Leave on a wire rack to cool.
The lavender in this recipe is quite a strong flavour, so I’m working on adapting this recipe somewhat. Personally I like the strong flavour but my family weren’t so keen, when I perfect this recipe I shall re-post with the new version. And given that this recipe is still in the experimental stages I have no idea what icing to suggest for these. That is something I shall figure out during further experiments.

Tuesday, 18 September 2012

National Cupcake Week

It has recently come to my attention (ok about 5 minutes ago, but that's recent!), that in the UK it is currently National Cupcake Week. Cupcake Week runs from the 17th of September until the 23rd

What is Cupcake Week all about? Well honestly I have no idea, I just consider it to be a good excuse to eat and bake lots of cake! But the official website indicates that this week is all about celebrating the creativity and passion of bakers.

So go on, show your support no matter where in the world you are. Bake some cakes or just buy some from your local shop.

http://www.nationalcupcakeweek.co.uk/

Monday, 17 September 2012

Monday Recipe: Chocolate and Raspberry Cupcakes (no fruit)

This is another variation of my fruity cupcakes; however this one is different in that there is actually no fruit in it at all! The raspberry flavour actually comes from a Raspberry and Dark Chocolate Hot Chocolate powder that I brought from Whittards. I don’t like it as a drink since I found the chocolate flavour to be a bit bitter and I couldn’t taste the raspberry, however I noticed that it’s just coco powder with raspberry flavouring added so I decided to add it to my baking ingredients. I find the raspberry flavour comes through much more strongly when used in cake mixture and has the advantage of allowing for raspberry cakes even when the fruit isn’t in season!
Sadly Whittards don’t currently stock this particular hot chocolate flavour so I can’t link to it. But I’m sure if you shop around it may be possible to find something similar, and if you do go into a Whittards I seriously suggest trying some of their other hot chocolate flavours. I find most of them to be very tasty!
As usual this is the cupcake maker version of the recipe, it makes 6 fairy cake sized cakes and can be scaled up to make more. Also works when baked in the oven.
Un iced as I was feeling lazy
 Ingredients
1 large egg
30g/1oz Self-rising flour, sifted
20g/1oz Raspberry and Dark Chocolate Hot Chocolate, sifted
50g/2oz Caster sugar
50g/2oz Softened butter or margarine
Method
Cream together the butter and sugar then beat in the egg. Fold in the flour and hot chocolate, divide evenly amongst 6 cake cases then bake in the cupcake maker for approximately 10 minutes or in the oven at Gas 4/180 C for about 15 minutes. The cakes are ready when a skewer inserted into the thickest part of the cake comes out clean!
Leave on a wire rack to cool.
Since the raspberry flavour is quite strong, I’d suggest topping these with a chocolate buttercream

Friday, 14 September 2012

Friday Review: Silicone Cake Cases

This is more of a discussion post than a review I’ll admit, but since I reference my own experiences and several products in this post it made sense to post it under reviews.
Silicone bakeware appears to be the next big thing in baking innovation, especially if the ever increasing amounts of silicone bakeware stocked by Lakeland are anything to go by! And I can see why, silicone is pretty amazing stuff to cook with. Silicone utensils are safe for use on non-stick items and silicone bakeware really utilises all the advantages silicone has to offer.
Silicone is great at transferring heat evenly, which means your cakes always have an even bake and its non-stick properties ensure that half your cake isn’t left behind. This also means you don’t have to spend ages greasing and lining tins although it does help to lightly grease some bakeware, especially the complex shapes that are available. Silicone is also much easier to store than conventional metal bakeware as it can be squashed into a box which helps when space is at a premium, the flexibility of silicone as a material also allows for more complex designs which wouldn’t necessarily be possible with paper cases or metal bakeware. Finally the major advantage especially for cupcake bakers is that it’s reusable, which is very economical if like me you bake a lot of cupcakes. Silicone bakeware is also safe for use in the freezer and microwave in addition to oven use, which is great because you can use one container to make all manner of things!
So far I’ve only found one downside to silicone cake cases and that is that you have to make sure they are 100% dry before you pack them away. If they aren’t completely dry it is possible for them to grow mould in storage. This happened to me with my first set of cupcake cases, in the end I had to throw them away as the mould actually stained the surface.
Currently I have 2 sets of silicone cake cases, both of which are of non-standard design (meaning they are different to normal cake cases). The first set are heart shaped and the second set are shaped like flower pots!
Heart shaped
 I brought these from Lakeland; however I can’t link you to them since they don’t appear to have any in stock at the moment. But if you wait until Valentines I’m sure they’ll be back! These are pretty cute, the only problem I have is that I’m never sure how much I should fill them which does mean that some of my cakes rise over the top of the case, this results in the heart shape becoming a bit lost. Other than that minor issue, which is entirely of my own making, I have no problem with these.
Please excuse the quality of this picture!
But you get a general idea of the cake size/shape

Flower Pots
These are also available from Lakeland and are brand new, and I have to say that I love them. They are adorable, and look fantastic when the cakes are iced and decorated. These are actually muffin cases rather than cupcake cases and are much easier to fill than the heart ones. Just fill them up to the base of the rim, this seems to be enough. They can be a little tricky to eat out of, but that problem is easily solved by removing the cake from the case. I’d suggest leaving any cakes made in these un-iced if you don’t want mucky fingers!
Just to illustrate how much the cake rises when filled to the base of the rim.
With a muffin baked in a standard muffin case.
Sadly I didn't think to take a side-view of this arrangement to illustrate the sizes.
So want to try out silicone bakeware? I’d suggest starting out with cupcake cases; it’s much easier to get a feel for the product with something small. And cupcake cases are relatively inexpensive, so if you decide silicone isn’t for you, you haven’t lost much. The normal shaped cases from Lakeland (linked below) are a great starter set; you can also find silicone bakeware in the home department of many large supermarkets. If you want fancy shaped cases like my heart ones or the flowerpots a trip to a specialist cookware shop is probably going to be required.

Wednesday, 12 September 2012

The Great British Bake Off – Technical Challenge

So today marks the start of a new series on Princess Cupcake, one inspired by the best cooking program on TV at the moment The Great British Bake Off. 
Given that I intend to apply to enter next year’s series of the show I have decided to set myself a challenge.  I will attempt to complete as many of the technical challenge recipes from the current (and previous) series of the show. This is naturally dependent on my liking the recipe and having access to the correct equipment, so I won’t be making last year’s pork pies with quail’s eggs for example as I really don’t like boiled eggs. The plan is that by completing as many of these recipes as possible I’ll be able to substantially increase my skills.
With each entry in the series I’ll be discussing what I think make this recipe a challenge and providing links to the recipe so that you guys can have a go too. If you do try and complete these challenges I’d love to hear about your results!
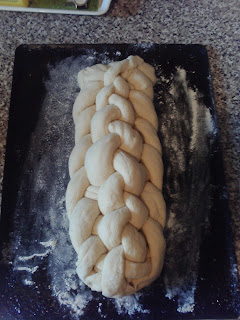
So to start the ball rolling I present my first completed challenge, it comes from Bread Week in series 3. The eight strand plaited loaf
Download the recipe here
So what’s the challenge?
Well it’s just a normal white loaf shaped differently, so since I’m pretty good at making white bread I didn’t find this element to be particularly hard, the challenge is defiantly is getting the plaiting right. But providing you concentrate and follow the instructions the plaiting isn’t too hard either, I think it helps to have some experience in plaiting though. Since I usually plait my hair I’m used to the numbering of stands and the movements required, which may be why I didn’t struggle too much, so if you are a plaiting newbie I’d suggest starting with a 3 strand loaf and getting the hang of that before attempting the 8 stand!
Getting the stands even was a little tricky, mine weren’t all the same thickness but I think that if they are all roughly the same it shouldn’t matter too much. Just weigh the dough and divide by 8 to work out how much each stand should weigh go from there that makes everything a lot easier!
Here's how mine looked
Finished plait prior to baking
The finished product!
The end came undone slightly during the second rising and baking but it still looks pretty good!
Final verdict and will I make it again?
It’s not very hard, not really a recipe for the plaiting newbie but if you have some understanding of plaiting techniques it isn’t that hard to do. The bread part is easy because it’s just a plain white loaf, so if you are good at bread making that bit is no problem! I probably will make it again; it takes a bit of time though so I’m probably only going to make it for special occasions as it does look pretty impressive.


Related Posts Plugin for WordPress, Blogger...