Friday, 28 September 2012

Friday Review: Buckingham Palace, Garden Cafe

My life has been a little hectic recently, which means I haven’t had time to write any book reviews so I’ve decided to post something a little different a review of the cakes I had during my visit to Buckingham Palace last week!
Every summer Buckingham Palace is opened allowing members of the public a chance to see the beautiful State Rooms and a special exhibition. This year the exhibition featured a selection of diamond jewellery and other diamond items from the Royal Collection as part of the Diamond Jubilee celebrations. Given my passion for shiny things and nice jewellery I had to go visit, but this post is not about the Palace it’s about cake so moving on. At the end of the tour, palace visitors are able to get refreshments in The Garden Cafe which is as suggested by the name, in the Palace garden.
Now I had skipped lunch that day, mostly so I had an excuse to buy more than one cake! And these are the cakes I brought.

On the left is a vanilla cheesecake and on the right is a fraisier, both of which were made especially for the Jubilee, hence the crowns on both. Those were made of a lovely dark chocolate.  These cakes were both really yummy, the cheesecake was so creamy with the strawberry sauce balancing out the flavors and stopping it becoming too sickly which can be a problem with cheesecakes. The fraisier was topped with marzipan and filled with some really nice strawberries and cream. Yummy!
Both cakes were also presented beautifully, and the fraisier actually came wrapped in a sheet of plastic to protect it. A nice touch! And the service was amazing, very quick and efficient (which is not surprising considering the amount of visitors they get each day!) and all the staff were extremely polite.  
To be honest the only thing I didn’t like was the price! Each cake cost me £4.75! But for cakes of this quality and when I take into account where I was buying them the price isn’t actually that bad. So in summary, if I ever visit the Palace again I am defiantly buying cake and if any of you ever visit I would seriously recommend the cakes. The cafe also sells sandwiches but they didn’t have any I liked (I’m quite picky about my sandwiches).
Also I am totally going to try and make my own fraisier, but that will probably have to wait until next summer.

Monday, 24 September 2012

Monday Recipe: Lavender Cupcakes

Monday Recipe: Lavender Cupcakes
As much as I love making fruit flavoured cupcakes there comes a time when all my favourite fruits are out of season and I have to stop. But that just means it’s time for some new flavours, and my current experimentation is with flower flavoured cakes!
I love using flower flavours, they are sufficiently different to intrigue people but not weird enough to freak them out! Rose is actually my all time favourite macaroon flavour, mostly because I love the smell of roses and when used in cooking it actually tastes the way it smells. Which I know sounds mad but try it and you’ll see what I mean! I know eating flowers is weird, but quite a lot of flowers are actually edible. At some point I will do some more research into this and post a list of edible flowers, but that shall have to wait.
So imagine my excitement when last summer I found Lavender Sugar available in Waitrose, naturally I had to buy some and I’ve finally figured out what to do with it! Hello cupcakes! These cakes smell divine and I was pleasantly surprised to discover that lavender (like rose) tastes the way it smells.

As this is an experimental recipe, all quantities are designed for use in a cupcake maker and will make 6 fairy sized cakes. However as always this recipe can easily be scaled up and (should) work when baked in the oven.
Sadly I can't find lavender sugar on Waitrose's online shopping, but this would be easy to make yourself. I'll write a tutorial on that later!
The little "spots" are actually lavender flowers!
Ingredients
1 large egg
50g/2oz Self-rising flour, sifted
50g/2oz Lavender Sugar
50g/2oz Softened butter or margarine
Method:
Cream together the butter and sugar then beat in the egg.  Fold in the flour and divide between 6 cake cases and then bake in the cupcake maker for approximately 10 minutes or in the oven at Gas 4/180 C for about 15 minutes. The cakes are ready when a skewer inserted into the thickest part of the cake comes out clean!
Leave on a wire rack to cool.
The lavender in this recipe is quite a strong flavour, so I’m working on adapting this recipe somewhat. Personally I like the strong flavour but my family weren’t so keen, when I perfect this recipe I shall re-post with the new version. And given that this recipe is still in the experimental stages I have no idea what icing to suggest for these. That is something I shall figure out during further experiments.

Tuesday, 18 September 2012

National Cupcake Week

It has recently come to my attention (ok about 5 minutes ago, but that's recent!), that in the UK it is currently National Cupcake Week. Cupcake Week runs from the 17th of September until the 23rd

What is Cupcake Week all about? Well honestly I have no idea, I just consider it to be a good excuse to eat and bake lots of cake! But the official website indicates that this week is all about celebrating the creativity and passion of bakers.

So go on, show your support no matter where in the world you are. Bake some cakes or just buy some from your local shop.

http://www.nationalcupcakeweek.co.uk/

Monday, 17 September 2012

Monday Recipe: Chocolate and Raspberry Cupcakes (no fruit)

This is another variation of my fruity cupcakes; however this one is different in that there is actually no fruit in it at all! The raspberry flavour actually comes from a Raspberry and Dark Chocolate Hot Chocolate powder that I brought from Whittards. I don’t like it as a drink since I found the chocolate flavour to be a bit bitter and I couldn’t taste the raspberry, however I noticed that it’s just coco powder with raspberry flavouring added so I decided to add it to my baking ingredients. I find the raspberry flavour comes through much more strongly when used in cake mixture and has the advantage of allowing for raspberry cakes even when the fruit isn’t in season!
Sadly Whittards don’t currently stock this particular hot chocolate flavour so I can’t link to it. But I’m sure if you shop around it may be possible to find something similar, and if you do go into a Whittards I seriously suggest trying some of their other hot chocolate flavours. I find most of them to be very tasty!
As usual this is the cupcake maker version of the recipe, it makes 6 fairy cake sized cakes and can be scaled up to make more. Also works when baked in the oven.
Un iced as I was feeling lazy
 Ingredients
1 large egg
30g/1oz Self-rising flour, sifted
20g/1oz Raspberry and Dark Chocolate Hot Chocolate, sifted
50g/2oz Caster sugar
50g/2oz Softened butter or margarine
Method
Cream together the butter and sugar then beat in the egg. Fold in the flour and hot chocolate, divide evenly amongst 6 cake cases then bake in the cupcake maker for approximately 10 minutes or in the oven at Gas 4/180 C for about 15 minutes. The cakes are ready when a skewer inserted into the thickest part of the cake comes out clean!
Leave on a wire rack to cool.
Since the raspberry flavour is quite strong, I’d suggest topping these with a chocolate buttercream

Friday, 14 September 2012

Friday Review: Silicone Cake Cases

This is more of a discussion post than a review I’ll admit, but since I reference my own experiences and several products in this post it made sense to post it under reviews.
Silicone bakeware appears to be the next big thing in baking innovation, especially if the ever increasing amounts of silicone bakeware stocked by Lakeland are anything to go by! And I can see why, silicone is pretty amazing stuff to cook with. Silicone utensils are safe for use on non-stick items and silicone bakeware really utilises all the advantages silicone has to offer.
Silicone is great at transferring heat evenly, which means your cakes always have an even bake and its non-stick properties ensure that half your cake isn’t left behind. This also means you don’t have to spend ages greasing and lining tins although it does help to lightly grease some bakeware, especially the complex shapes that are available. Silicone is also much easier to store than conventional metal bakeware as it can be squashed into a box which helps when space is at a premium, the flexibility of silicone as a material also allows for more complex designs which wouldn’t necessarily be possible with paper cases or metal bakeware. Finally the major advantage especially for cupcake bakers is that it’s reusable, which is very economical if like me you bake a lot of cupcakes. Silicone bakeware is also safe for use in the freezer and microwave in addition to oven use, which is great because you can use one container to make all manner of things!
So far I’ve only found one downside to silicone cake cases and that is that you have to make sure they are 100% dry before you pack them away. If they aren’t completely dry it is possible for them to grow mould in storage. This happened to me with my first set of cupcake cases, in the end I had to throw them away as the mould actually stained the surface.
Currently I have 2 sets of silicone cake cases, both of which are of non-standard design (meaning they are different to normal cake cases). The first set are heart shaped and the second set are shaped like flower pots!
Heart shaped
 I brought these from Lakeland; however I can’t link you to them since they don’t appear to have any in stock at the moment. But if you wait until Valentines I’m sure they’ll be back! These are pretty cute, the only problem I have is that I’m never sure how much I should fill them which does mean that some of my cakes rise over the top of the case, this results in the heart shape becoming a bit lost. Other than that minor issue, which is entirely of my own making, I have no problem with these.
Please excuse the quality of this picture!
But you get a general idea of the cake size/shape

Flower Pots
These are also available from Lakeland and are brand new, and I have to say that I love them. They are adorable, and look fantastic when the cakes are iced and decorated. These are actually muffin cases rather than cupcake cases and are much easier to fill than the heart ones. Just fill them up to the base of the rim, this seems to be enough. They can be a little tricky to eat out of, but that problem is easily solved by removing the cake from the case. I’d suggest leaving any cakes made in these un-iced if you don’t want mucky fingers!
Just to illustrate how much the cake rises when filled to the base of the rim.
With a muffin baked in a standard muffin case.
Sadly I didn't think to take a side-view of this arrangement to illustrate the sizes.
So want to try out silicone bakeware? I’d suggest starting out with cupcake cases; it’s much easier to get a feel for the product with something small. And cupcake cases are relatively inexpensive, so if you decide silicone isn’t for you, you haven’t lost much. The normal shaped cases from Lakeland (linked below) are a great starter set; you can also find silicone bakeware in the home department of many large supermarkets. If you want fancy shaped cases like my heart ones or the flowerpots a trip to a specialist cookware shop is probably going to be required.

Wednesday, 12 September 2012

The Great British Bake Off – Technical Challenge

So today marks the start of a new series on Princess Cupcake, one inspired by the best cooking program on TV at the moment The Great British Bake Off. 
Given that I intend to apply to enter next year’s series of the show I have decided to set myself a challenge.  I will attempt to complete as many of the technical challenge recipes from the current (and previous) series of the show. This is naturally dependent on my liking the recipe and having access to the correct equipment, so I won’t be making last year’s pork pies with quail’s eggs for example as I really don’t like boiled eggs. The plan is that by completing as many of these recipes as possible I’ll be able to substantially increase my skills.
With each entry in the series I’ll be discussing what I think make this recipe a challenge and providing links to the recipe so that you guys can have a go too. If you do try and complete these challenges I’d love to hear about your results!
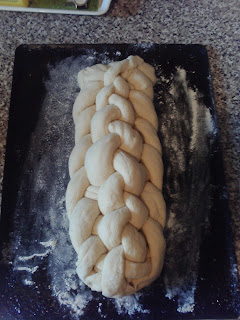
So to start the ball rolling I present my first completed challenge, it comes from Bread Week in series 3. The eight strand plaited loaf
Download the recipe here
So what’s the challenge?
Well it’s just a normal white loaf shaped differently, so since I’m pretty good at making white bread I didn’t find this element to be particularly hard, the challenge is defiantly is getting the plaiting right. But providing you concentrate and follow the instructions the plaiting isn’t too hard either, I think it helps to have some experience in plaiting though. Since I usually plait my hair I’m used to the numbering of stands and the movements required, which may be why I didn’t struggle too much, so if you are a plaiting newbie I’d suggest starting with a 3 strand loaf and getting the hang of that before attempting the 8 stand!
Getting the stands even was a little tricky, mine weren’t all the same thickness but I think that if they are all roughly the same it shouldn’t matter too much. Just weigh the dough and divide by 8 to work out how much each stand should weigh go from there that makes everything a lot easier!
Here's how mine looked
Finished plait prior to baking
The finished product!
The end came undone slightly during the second rising and baking but it still looks pretty good!
Final verdict and will I make it again?
It’s not very hard, not really a recipe for the plaiting newbie but if you have some understanding of plaiting techniques it isn’t that hard to do. The bread part is easy because it’s just a plain white loaf, so if you are good at bread making that bit is no problem! I probably will make it again; it takes a bit of time though so I’m probably only going to make it for special occasions as it does look pretty impressive.


Monday, 10 September 2012

Monday Recipe: Raspberry Drop Scones

Just a quick recipe today as I'm a bit busy at the moment! It's yet another fruit recipe, but it's not cupcakes and raspberries are still in season so it's fine! And drop scones are one of my favourite snacks.

I take no credit for inventing these, I took the recipe out of a magazine I think it was a Sainsburys one... Also no picture today as these don't tend to last long enough to get a picture!

Ingredients
125g/4oz self-rising flour
50g/2oz soft brown sugar
2 eggs
2 tbsp buttermilk or normal milk
1 tsp baking powder
1/2 tsp ground cinnamon
150g/5oz raspberries

Method
Sift together the flour, baking powder and cinnamon, then stir in the sugar and a pinch of salt. Beat the milk and the eggs together and then add to the flour mix. Whisk together and then stir in the raspberries. Heat some oil or butter in a frying pan, then add a spoonful of mixture into the pan. (I find a tablespoon or dessertspoon works best.) Cook for a couple of minutes on each side.

Serve warm with a nice cup of tea. If you can avoid eating them all while they are hot, they do taste really nice cold.

Saturday, 8 September 2012

The Big Knit

For those who don't know, The Big Knit is a campaign that Innocent Drinks run every year. They put little knitted hats on bottles of smoothie and for each smoothie wearing a hat that gets sold they donate 25p to charity. This year the charity is Age UK, and the hats are knitted by members of the public.

Now normally I just buy the smoothies with hats on, and consequently confuse shoppers in Sainsbury's by searching the shelves for the best hats! However this year my knitting has improved enought that I feel confident enough to take part and knit some hats! So yeah that's why updates here have slowed a bit recently, I've been busy knitting.
Normal service shall resume on Monday, and Wednesday will see the start of a new series of posts. I'll probably post a few pictures of my hats in the next few weeks, including my cute Cupcake Hat!

Want to know more or take part? Then click the link below and if you see any smoothies wearing hats please buy them, it's worth it Innocent Smoothies are really tasty!
http://www.innocentdrinks.co.uk/bigknit
Related Posts Plugin for WordPress, Blogger...